


 |
| Parts of word window |


07 Tabs
- Home
- insert
- page layout
- References
- Millings
- review
- view
- Clipboard
- Front
- Paragraph
- Styles
- Editing
The Microsoft Office Button
In the upper-left corner of the Word 2007 window is the Microsoft Office button. When you click the button, a menu appears. You can use the menu to create a new file, open an existing file, save a file, and perform many other tasks.
The Quick Access Toolbar
Next to the Microsoft Office button is the Quick Access toolbar. The Quick Access toolbar provides you with access to commands you frequently use. By default Save, Undo, and Redo appear on the Quick Access toolbar. You can use Save to save your file, Undo to rollback an action you have taken, and Redo to reapply an action you have rolled back.The Title Bar
Next to the Quick Access toolbar is the Title bar. The Title bar displays the title of the document on which you are currently working. Word names the first new document you open Document1. As you open additional new documents, Word names them sequentially. When you save your document, you assign the document a new name.The Ribbon
You use commands to tell Microsoft Word what to do. In Microsoft Word 2007, you use the Ribbon to issue commands. The Ribbon is located near the top of the screen, below the Quick Access toolbar. At the top of the Ribbon are several tabs; clicking a tab displays several related command groups. Within each group are related command buttons. You click buttons to issue commands or to access menus and dialog boxes. You may also find a dialog box launcher in the bottom-right corner of a group. Clicking the dialog box launcher gives you access to additional commands via a dialog box.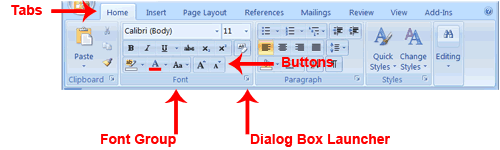
The Ruler
The ruler is found below the Ribbon.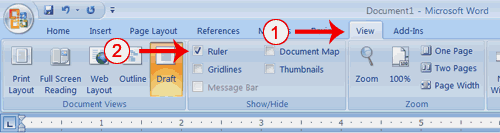
- Click the View tab to choose it.
- Click the check box next to Ruler in the Show/Hide group. The ruler appears below the Ribbon.
The Text Area
Just below the ruler is a large area called the text area. You type your document in the text area. The blinking vertical line in the upper-left corner of the text area is the cursor. It marks the insertion point. As you type, your text displays at the cursor location. The horizontal line next to the cursor marks the end of the document.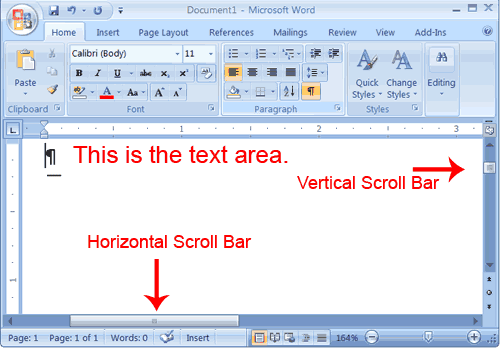
create Sample Data and Select Text
If you type =rand() in your Word document and then press Enter, Word creates three paragraphs. You can use these paragraphs to practice what you learn. Throughout these lessons, you will be asked to select text. The following exercise teaches you how to create data and how to select data. You can select by using the arrow keys or by clicking and dragging. When using the arrow keys, use the up arrow to move up, the down arrow to move down, the left arrow to move left, and the right arrow to move right. When using the mouse, press the left mouse button and then drag in the direction you want to move.EXERCISE 1
Create Sample Data
- Type =rand().
- Press Enter. Three paragraphs appear in your document.
No comments:
Post a Comment